Intelligently Scale Your Nodes in an EKS Cluster Using Karpenter: A Guide
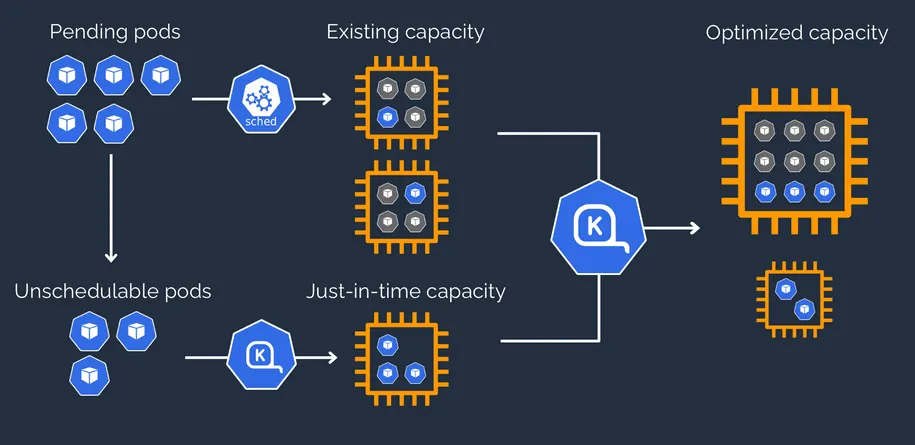
Karpenter is an open-source project created and maintained by AWS itself, and it's become one of the most widely adopted tools in the EKS world. As their own docs put it:
Karpenter automatically launches just the right compute resources to handle your cluster's applications. It is designed to let you take full advantage of the cloud with fast and simple compute provisioning for Kubernetes clusters.
This post looks at Karpenter's advantages over the vanilla Cluster Autoscaler, then digs into its core components 📚 — but first, why Karpenter at all?
Why Karpenter over the vanilla Cluster Autoscaler
- Better resource optimization — Karpenter dynamically chooses the right instance family, size, and even between on-demand and spot instances, based on actual workload usage, keeping both cost and resource utilization in check. Cluster Autoscaler (CA), by contrast, only scales within a fixed set of pre-configured ASGs — it can't consolidate nodes dynamically, which leaves resource waste on the table.
- Native AWS integration — Karpenter is a native AWS integration, more finely tuned for optimized capacity allocation, EC2 Spot instances, and Launch Templates, which makes it noticeably faster to react than CA when scaling nodes.
- Granularity — a Karpenter NodePool lets you constrain node size, architecture, operating system, and far more. CA is more rigid — scaling is bound to whatever ASGs you pre-configured.
That first point — picking the right instance family and capacity type per workload — comes down to a NodePool requirement like this:
- key: "node.kubernetes.io/instance-type" # choose from a variety of instance types
  operator: In
  values: ["r6g.2xlarge", "r6g.xlarge"]
- key: "karpenter.sh/capacity-type" # choose from a variety of capacity types
  operator: In
  values: ["on-demand", "spot"]
Karpenter also has a feature the vanilla autoscaler doesn't: disruption budgets, which let you control exactly how and when it's allowed to consolidate the nodes it provisioned.
disruption:
  # Describes which types of Nodes Karpenter should consider for consolidation.
  # 'WhenEmptyOrUnderutilized': consider all nodes, and remove or replace a
  # Node once it's empty or underutilized enough to reduce cost.
  # 'WhenEmpty': only consider nodes that contain no workload pods.
  consolidationPolicy: WhenEmptyOrUnderutilized | WhenEmpty

  # How long Karpenter waits to consolidate a node after a pod is added or
  # removed from it. Set to 'Never' to disable consolidation entirely.
  consolidateAfter: 1m | Never

  # Budgets control how fast Karpenter is allowed to scale down nodes.
  # Karpenter respects the minimum of all currently active budgets, and
  # rounds up when considering percentages. Duration and schedule must be
  # set together.
  budgets:
    - nodes: 10%
    # On weekdays during business hours, don't deprovision at all.
    - schedule: "0 9 * * mon-fri"
      duration: 8h
      nodes: "0"
Karpenter in action: the two core components
Karpenter is built around two resources: EC2NodeClass and NodePool.
EC2NodeClass
EC2NodeClass defines what a Karpenter-provisioned node actually looks like: the AMI family, the instance profile it needs to have the right permissions, and optionally the subnets and security groups to use. You can also set blockDeviceMappings if you want the node mounted to a snapshot volume, and a userData script the node runs at boot.
apiVersion: karpenter.k8s.aws/v1beta1
kind: EC2NodeClass
metadata:
  name: <NODE GROUP NAME>
spec:
  amiFamily: <AMI FAMILY>
  subnetSelectorTerms:
    - tags:
        <SUBNET TAGS>
  role: <INSTANCE PROFILE>
  amiSelectorTerms:
    - id: <AMI ID>
  userData: |
    <CUSTOM USER DATA SCRIPT>
  tags:
    <TAG1>
    <TAG2>
  blockDeviceMappings:
    - deviceName: /dev/xvda
      ebs:
        volumeSize: <DISK SIZE>
        volumeType: gp3
        encrypted: true
NodePool
NodePool defines the constraints on the nodes Karpenter creates: taints and startup taints to limit which pods can land on them, availability across AZs, size and CPU limits, and which instance types and architectures are allowed. It's also where disruption budgets live, controlling when and how Karpenter consolidates these nodes.
apiVersion: karpenter.sh/v1beta1
kind: NodePool
metadata:
  name: <NODE GROUP NAME>
spec:
  template:
    metadata:
      labels:
        "nodepool": <NODE GROUP NAME>
    spec:
      nodeClassRef:
        apiVersion: karpenter.k8s.aws/v1beta1
        kind: EC2NodeClass
        name: <NODE GROUP NAME> # created above
      requirements:
        - key: "node.kubernetes.io/instance-type" # choose your instance type
          operator: In
          values: ["r6g.2xlarge", "r6g.xlarge"]
        - key: "karpenter.sh/capacity-type" # choose your capacity type
          operator: In
          values: ["on-demand"]
        - key: "kubernetes.io/arch" # choose your architecture type
          operator: In
          values: ["arm64"]
        - key: "kubernetes.io/os" # choose your OS type
          operator: In
          values: ["linux"]
      taints:
        - key: <KEY>
          value: <VALUE>
          effect: <EFFECT>
      startupTaints:
        - key: <KEY>
          value: <VALUE>
          effect: <EFFECT>
  limits:
    cpu: <CPU LIMIT>
    memory: <MEMORY LIMIT>
  disruption:
    consolidationPolicy: WhenEmptyOrUnderutilized | WhenEmpty
    expireAfter: 300s # expire the node 5 minutes after creation
    budgets: # consolidate nodes only on weekends, never on weekdays
      - nodes: "1"
        schedule: "* * * * *"
        duration: 24h
      - nodes: "0"
        schedule: "* * * * mon-fri"
        duration: 24h
Installing Karpenter
Before deploying an EC2NodeClass and NodePool, install Karpenter on the cluster via Helm:
helm upgrade --install --namespace karpenter --create-namespace \
  karpenter oci://public.ecr.aws/karpenter/karpenter \
  --version ${KARPENTER_VERSION} \
  --set serviceAccount.annotations."eks\.amazonaws\.com/role-arn"=${KARPENTER_IAM_ROLE_ARN} \
  --set settings.aws.clusterName=${CLUSTER_NAME} \
  --set settings.aws.clusterEndpoint=${CLUSTER_ENDPOINT} \
  --set defaultProvisioner.create=false \
  --set settings.aws.defaultInstanceProfile=KarpenterNodeInstanceProfile-${CLUSTER_NAME} \
  --set settings.aws.interruptionQueueName=${CLUSTER_NAME} \
  --wait
IRSA (IAM Roles for Service Accounts) needs to be set up first — the Karpenter deployment won't succeed without it.
Testing it with a sample deployment
With Karpenter installed and an EC2NodeClass/NodePool deployed, create a sample pod deployment that targets that NodePool via a nodeSelector:
apiVersion: apps/v1
kind: Deployment
metadata:
  name: sample-deploy
spec:
  replicas: 1
  selector:
    matchLabels:
      app: <NODE GROUP NAME>
  template:
    metadata:
      labels:
        app: <NODE GROUP NAME>
    spec:
      nodeSelector:
        "nodepool": <NODE GROUP NAME>
      tolerations:
        - key: <KEY>
          operator: Exists
          effect: NoSchedule
      containers:
        - name: nginx-container
          image: nginx:latest
          resources:
            requests:
              cpu: 1
After deploying this, the pod starts out Pending — there's no node yet carrying the label "nodepool": <NODE GROUP NAME>.
That's where Karpenter kicks in: its controller pods notice the pending deployment needs a matching nodeSelector, and intelligently provision a new node for it — configured exactly per the EC2NodeClass and NodePool deployed earlier — so the pod can finally be scheduled.
Key takeaways
- Karpenter scales per-pod requirements directly into an EC2 instance choice — instance family, capacity type, architecture — instead of scaling within fixed, pre-configured ASGs the way Cluster Autoscaler does.
- Disruption budgets are the lever for controlling how aggressively Karpenter consolidates nodes — you can protect business hours from disruption while still letting it consolidate freely on weekends.
- EC2NodeClass answers 'what does this node look like' (AMI, IAM, storage); NodePool answers 'what's allowed to run on it and when should it go away' (taints, limits, disruption).
- A pod's nodeSelector against a NodePool's label is what actually triggers Karpenter — a Pending pod with no matching node is the signal it reacts to.
Written by Shubham Jain, Cloud Engineer at Newspresso Tech.
More posts
How I Built an AI-Powered Lead Qualification & Routing System in n8n (Production-Ready)
A webhook-driven n8n workflow that validates inbound leads, scores intent with a guardrailed AI agent, and routes each one — CRM deal, Slack ping, drafted email, or just a log line — based on how hot it actually is.

Building an AI-Powered Ad Generation System for Businesses 💸
An end-to-end n8n workflow that turns a product name, description, and a couple of photos into a fully edited, titled, thumbnailed video ad — uploaded straight to YouTube, no manual editing.
How I Built a Production-Safe Webhook Intake System in n8n
Why most automations fail before AI or CRMs ever get involved — and the defensive n8n webhook pattern that stops bad data at the door: validate, normalize, respond deterministically, no silent failures.